SVG 研究之路 (27) - filter - feImage
feImage 是 SVG filter 裏頭最簡單的濾鏡,不過為什麼要用一篇文章專門介紹它呢?就是因為 feImage 可以幫助我們更實際的了解 filter 的原理,除此之外,這篇文章也會搭配另外一個最簡單的濾鏡 feTile ( 到底有幾個最簡單呀 ) 藉由實際的範例來深入了解 SVG filter 的博大精深吧!
feImage
feImage 人如其名的就是把圖片當濾鏡,設定圖片的長寬,搭配 feTitle 就可以把圖片重複運用在我們的圖形當中,有點類似 SVG Patterns,一如往常,先來瞧瞧 feImage 有哪些屬性可以設定:
- xlink:href
- x
- y
- width
- height
- preserveAspectRatio
來解釋一下這些屬性吧,第一個xlink:href,這其實就要我們放上圖片的網址,就有點類似 img 標籤的 src 一樣,而x,y,width,height 則有兩種參數格式,如果我們把 filter 的 primitiveUnits 設為 objectBoundingBox,那麼這四個參數的就是和我們形狀的「比例」,如果把 filter 的 primitiveUnits 設為 userSpaceOnUse,那麼使用的就是和 SVG 的比例,為什麼會這樣呢?請參考:SVG 研究之路 (26) - 有趣的 Patterns 有非常詳細的解釋,而同樣的關鍵在 filter 也是大同小異,objectBoundingBox 是圖形的比例,userSpaceOnUse 是和這個 SVG 的比例,這樣記就沒錯了,而 filter 的 primitiveUnits 是指 filter 內部的濾鏡效果單位,而 filter 另外一個 filterUnits 則是 filter 自己的單位,非常非常重要,使用 filter 就必須要牢牢記住!不過在 feimage 的濾鏡裡,filter 使用 userSpaceOnUse 的單位是像素,primitiveUnits 的單位是比例喔!( 不熟的話也沒關係,發現用起來很怪,可能就是比例和像素上出了問題 )
然而看到 preserveAspectRatio 這個屬性,第一個念頭一定要想到這篇:SVG 研究之路 (23) - 理解 viewport 與 viewbox 主要就是在定義 feImage 我們所使用的 image 自身和自身 viewbox 的位置與填滿定義。
效果實作
上述的一堆文字就是在介紹屬性,為了避免昏頭,以及為了許多像我這樣喜歡看圖片說明的人,再來就直接用範例解釋,下面的所有範例都將會使用一張 300x300 的圖片作為 feImage 的圖檔 ( 我自己畫的誕生版蒙娜麗莎 ),同時會放上兩個示意的 div 表現 SVG 的外框 ( 黑色 ) 與套用濾鏡形狀的外框 ( 藍色 )。
首先一定要看看在完全不設定的情況下套用 feImage:
<svg width="360" height="220">
  <defs>
    <filter id="f">
      <feImage xlink:href="https://www.oxxostudio.tw/img/articles/201410/20141003_1_demo.jpg" />
    </filter>
  </defs>
  <rect x="30" y="30" width="150" height="150" filter="url(#f)" />
  <rect x="30" y="30" width="150" height="150" stroke="#00f" fill="none" />
  <rect x="0" y="0" width="360" height="220" stroke="#000" fill="none" stroke-width="2" />
</svg>
![]()
由上圖可以發現,我們套用的圖片濾鏡竟然「超出範圍」了!?這鳩竟是怎麼回事呀?其實這是 filter 在 SVG 裏頭的一個定義,就是基本上不管套用任何濾鏡,『如果沒有指定大小,一定會大於套用濾鏡的形狀範圍,長寬以以 120% 的方式呈現,x 與 y 則以 -10% 來呈現』,為什麼呢?因為我們的濾鏡套用的時候,通常都會讓作用的形狀超過範圍,舉個例子來說,如果今天我們讓圖片剛剛好滿足形狀大小,然後讓圖片套用模糊濾鏡,就會發現四周變成白白的 ( 因為底色是白的 ),這也是為什麼 filter 在預設的情形下,一定會大於套用的範圍。
![]()
再來我們把濾鏡加上一些屬性,有趣的來了,因為 filter 的 primitiveUnits 預設為 userSpaceOnUse,所以我們寫的 width="100" 和 height="100" 就是實際的 100x100,而 x=0 和 y=0 就是正方形的 (30,30) 座標但是要再往上往左偏移 10%。
  <defs>
    <filter id="f">
      <feImage xlink:href="https://www.oxxostudio.tw/img/articles/201410/20141003_1_demo.jpg" x="0" y="0" width="100" height="100" />
    </filter>
  </defs>
  <rect x="30" y="30" width="150" height="150" filter="url(#f)" />
  <rect x="30" y="30" width="150" height="150" stroke="#00f" fill="none" />
![]()
如果不相信,我們來做一些屬性上的改變,把 primitiveUnits 改為 objectBoundingBox,這時候 width 和 height 就不能設為 100 ,因為是 100 倍,我們將其設為 1.5 試試看,我們就會發現圖片變成 1.5 倍大也就是變成 150*1.5=225 了,不過也因為受限於 filter 是套用在 150x150 的大小,所以長寬只會只會多出 10% ( 上面有解釋過為什麼會多出 10% )
  <defs>
    <filter id="f" primitiveUnits="objectBoundingBox">
      <feImage xlink:href="https://www.oxxostudio.tw/img/articles/201410/20141003_1_demo.jpg" x="0" y="0" width="1.5" height="1.5" />
    </filter>
  </defs>
  <rect x="30" y="30" width="150" height="150" filter="url(#f)" />
  <rect x="30" y="30" width="150" height="150" stroke="#00f" fill="none" />
![]()
這樣很麻煩呀!我到底該如何設定才能剛好填滿呢?其實有很多方法,第一個方法就是直接設定 filter 的大小 ( 注意不是 feImage,這兩者不同喔! ) 因為在 filter 沒有設定屬性的情況下,上下左右一定都會多出 10%,只要有設定就不會多出去了。
  <defs>
    <filter id="f" primitiveUnits="objectBoundingBox" x="0" y="0" width="1" height="1">
      <feImage xlink:href="https://www.oxxostudio.tw/img/articles/201410/20141003_1_demo.jpg" x="0" y="0" width="1.5" height="1.5" />
    </filter>
  </defs>
  <rect x="30" y="30" width="150" height="150" filter="url(#f)" />
  <rect x="30" y="30" width="150" height="150" stroke="#00f" fill="none" />
![]()
不然如果不設定 filter,設定 feImage 的長寬也是可以,不過填滿的長相完全不同喔!
  <defs>
    <filter id="f" primitiveUnits="objectBoundingBox">
      <feImage xlink:href="https://www.oxxostudio.tw/img/articles/201410/20141003_1_demo.jpg" x="0" y="0" width="1" height="1" />
    </filter>
  </defs>
  <rect x="30" y="30" width="150" height="150" filter="url(#f)" />
  <rect x="30" y="30" width="150" height="150" stroke="#00f" fill="none" />
![]()
也因此我們也可以不用填滿,縮小也沒問題
<feImage xlink:href="https://www.oxxostudio.tw/img/articles/201410/20141003_1_demo.jpg" x="0" y="0" width=".5" height=".5" />
![]()
然後縮小之後,我們就可以使用 preserveAspectRatio 這個對齊的指令,忘記的話趕快回去看一下這篇 SVG 研究之路 (23) - 理解 viewport 與 viewbox 這個屬性如果沒有設定,預設值為:xMidYMid meet,不過這裡比較特別的地方,如果我們將長寬設為同比例,看起來就不會有影響,因為這個屬性主導的是對齊和填滿,如果比例不同,就會以比較大的數值為主,例如下面的範例,設為 xMidYMax slice,圖片就對齊形狀底部,超過的範圍就裁切掉。
  <defs>
    <filter id="f" primitiveUnits="objectBoundingBox" x="0" y="0" width="1" height="1">
      <feImage xlink:href="https://www.oxxostudio.tw/img/articles/201410/20141003_1_demo.jpg" width="1" height="1" preserveAspectRatio="xMidYMax slice" />
    </filter>
  </defs>
  <rect x="30" y="30" width="250" height="150" filter="url(#f)" />
  <rect x="30" y="30" width="250" height="150" stroke="#00f" fill="none" />
![]()
改成這樣又更明顯:
<feImage xlink:href="https://www.oxxostudio.tw/img/articles/201410/20141003_1_demo.jpg" width=".2" height="1" preserveAspectRatio="xMaxYMax slice" />
![]()
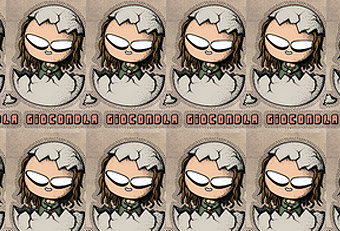
了解了 feImage 之後,再來就看看常與 feImage 搭配的 feTile,顧名思義就是瓷磚、拼貼圖案,直接來看看套用的效果:
  <defs>
    <filter id="f" primitiveUnits="objectBoundingBox" x="0" y="0" width="1" height="1">
      <feImage xlink:href="https://www.oxxostudio.tw/img/articles/201410/20141003_1_demo.jpg" width=".4" height=".4"/>
      <feTile/>
    </filter>
  </defs>
  <rect x="30" y="30" width="250" height="150" filter="url(#f)" />
  <rect x="30" y="30" width="250" height="150" stroke="#00f" fill="none" />
![]()
當然如果 feImage 設定了 preserveAspectRatio,就會有裁切的效果出現:
<feImage xlink:href="https://www.oxxostudio.tw/img/articles/201410/20141003_1_demo.jpg" width=".2" height="1" preserveAspectRatio="xMidYMax slice"/>
<feTile/>
![]()
小結
以上就是 feImage 和 feTile 的使用方式,連帶也將 filter 的設定做了完整的解釋,不過這篇的重點不在於使用出來的效果,而是在 objectBoundingBox 與 userSpaceOnUse 定位的觀念,非常重要!一定要搞懂呀!